This article will tell you how to quickly quickly set up IPsec VPN on industrial cellular router in just 3 steps. Before we get start, let’s explore what is IPsec and its importance to IoT.
What is IPsec?
According to Wiki, IPsec stands for Internet Protocol Security, it is a secure network protocol suite that authenticates and encrypts the packets of data to provide secure encrypted communication between two computers over an Internet Protocol network. It is used in virtual private networks (VPNs).
IPsec includes protocols for establishing mutual authentication between agents at the beginning of a session and negotiation of cryptographic keys to use during the session. IPsec can protect data flows between a pair of hosts (host-to-host), between a pair of security gateways (network-to-network), or between a security gateway and a host (network-to-host). IPsec uses cryptographic security services to protect communications over Internet Protocol (IP) networks. It supports network-level peer authentication, data-origin authentication, data integrity, data confidentiality (encryption), and replay protection.
Bivocom industrial cellular routers&gateways not only support IPsec VPN, but also GRE, PPTP, L2TP, OpenVPN, which provide a secure connectivity for your industrial IoT applications. Bivocom industrial cellular routers, IoT gateways both support VPN client and server mode.
IPsec’s Importance to IoT
As you know, the industrial cellular routers are mainly used for mission-critical industrial applications, such as industry 4.0, water & wastewater treatment, electricity, gas and oil, and all these applications not only require robust and reliable, but also secure connectivity between field sensors, controllers and remote cloud server, to ensure data security. But do you know how to quick set up IPsec VPN on Bivocom industrial cellular routers & gateways in just 3 main steps?
OK, let’s get started.
How to Quickly Set Up IPsec VPN On Industrial Cellular Router?
1. Network Topology
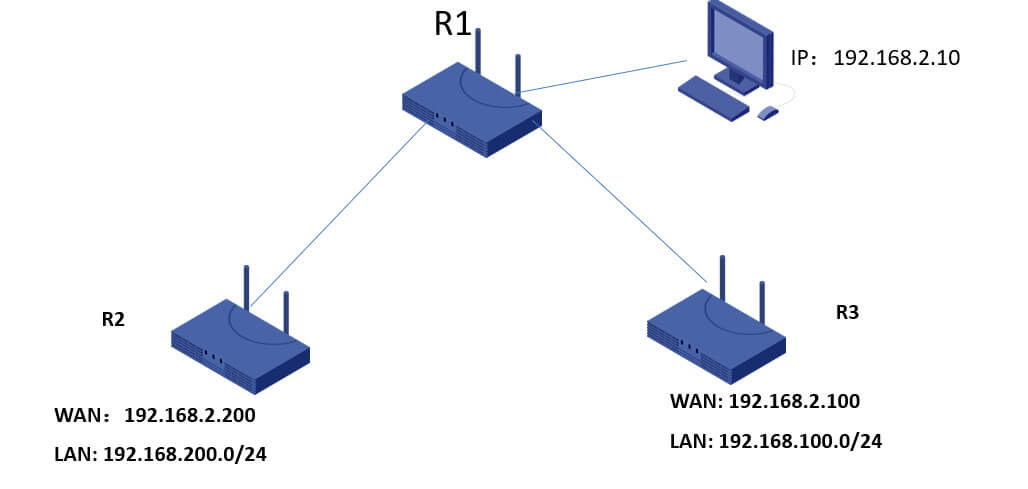
Note:
1)R2 WAN port connect to R1 LAN to get a IP address 192.168.2.200; also R2 has its own LAN subnet 192.168.200.0/24;
2)R3 WAN port connect to R1 LAN to get a IP address 192.168.2.100; also R3 has its own LAN subnet 192.168.100.0/24;
3)R2 LAN can’t communicate with R3 LAN for each other, we need setup a VPN tunnel between R2 LAN and R3 LAN.
2. Configure VPN Server
1) Configure R2 as a IPSec VPN Server via WebUI>>VPN>>IPSec.
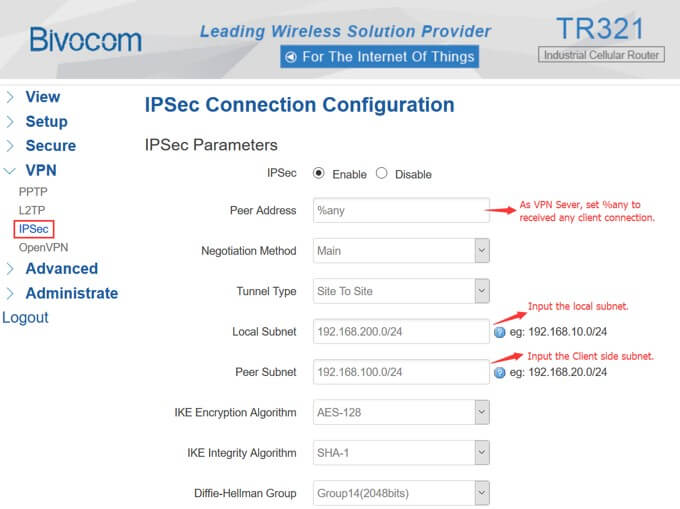
2) Configure R2 as a IPSec VPN Server via WebUI>>VPN>>IPSec.
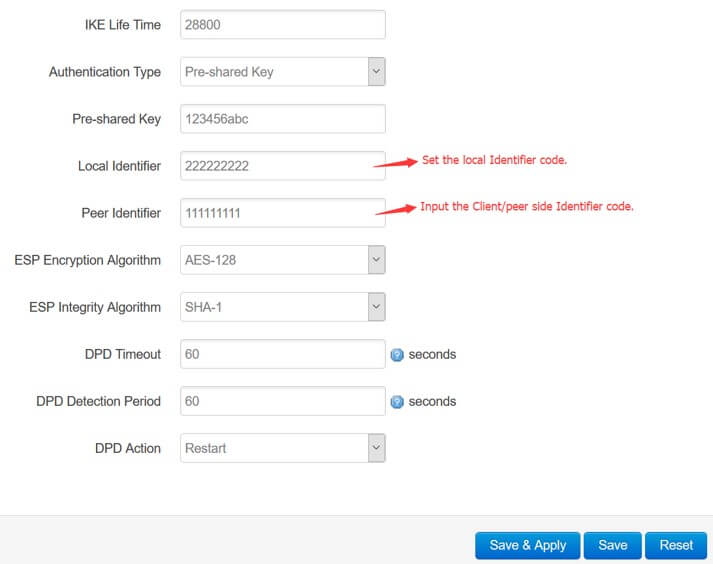
3. Configure VPN Client
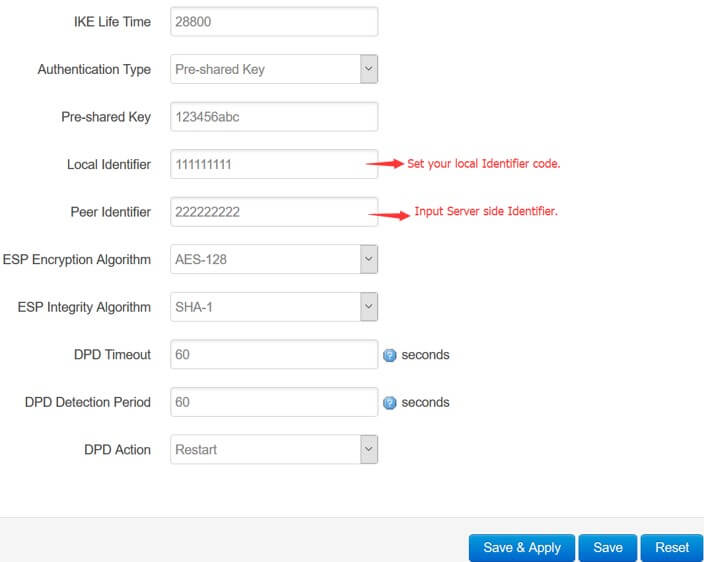
1) Configure R3 as a IPSec VPN Client via WebUI>>VPN>>IPSec.
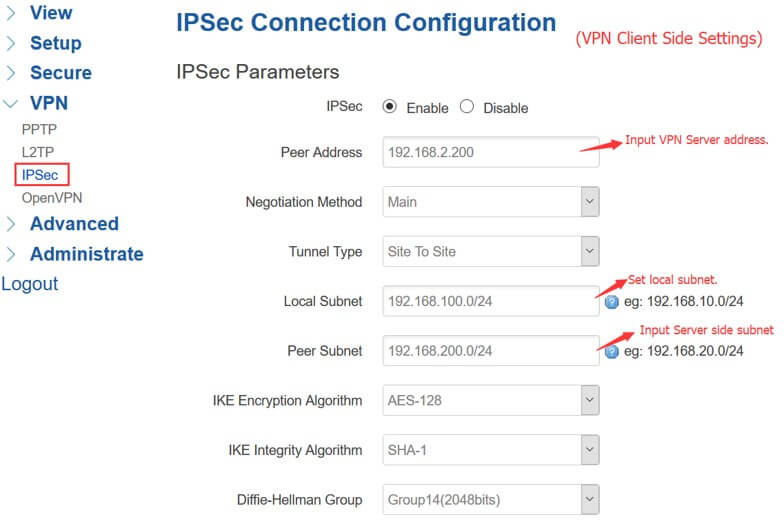
2) Configure R3 as a IPSec VPN Client via WebUI>>VPN>>IPSec.
4. Check VPN Connection status on Client
1) After configured VPN server and VPN client settings, check the VPN Client connection status via WebUI>>View>>VPN Status.
If everything goes well, the connect status would be CONNECTED.

5. Network Topology after setup VPN
Note:
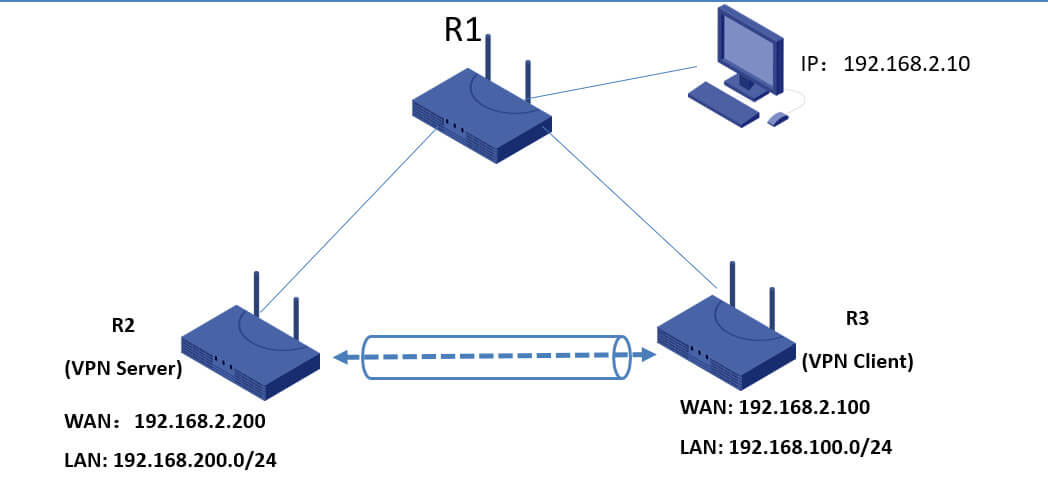
1)R2 as a VPN Server, the WAN port connect to R1 LAN to get a IP address 192.168.2.200; also R2 has its own LAN subnet 192.168.200.0/24;
2)R3 as a VPN Client, the WAN port connect to R1 LAN to get a IP address 192.168.2.100; also R3 has its own LAN subnet 192.168.100.0/24;
3)After VPN configuration, R2 LAN with R3 LAN setup a VPN tunnel to communicate each other.
If you have any other questions, please feel free to contact us at [email protected]




Comment