This article tells you how to quickly connect Bivocom IoT routers and Gateways to AWS IoT Core, and transfer the data from IoT router to AWS IoT core via MQTT protocol over 4G network.
What You Need?
- Create an AWS account
- AWS IoT SDK
- Bivocom 4G IoT Router TR321(32M Flash Version supports Python programming)
Let’s get started!
Steps of Connecting IoT Router to AWS IoT Core
1. Create an AWS account
2. Login your AWS account and search for IoT Core, then click it.
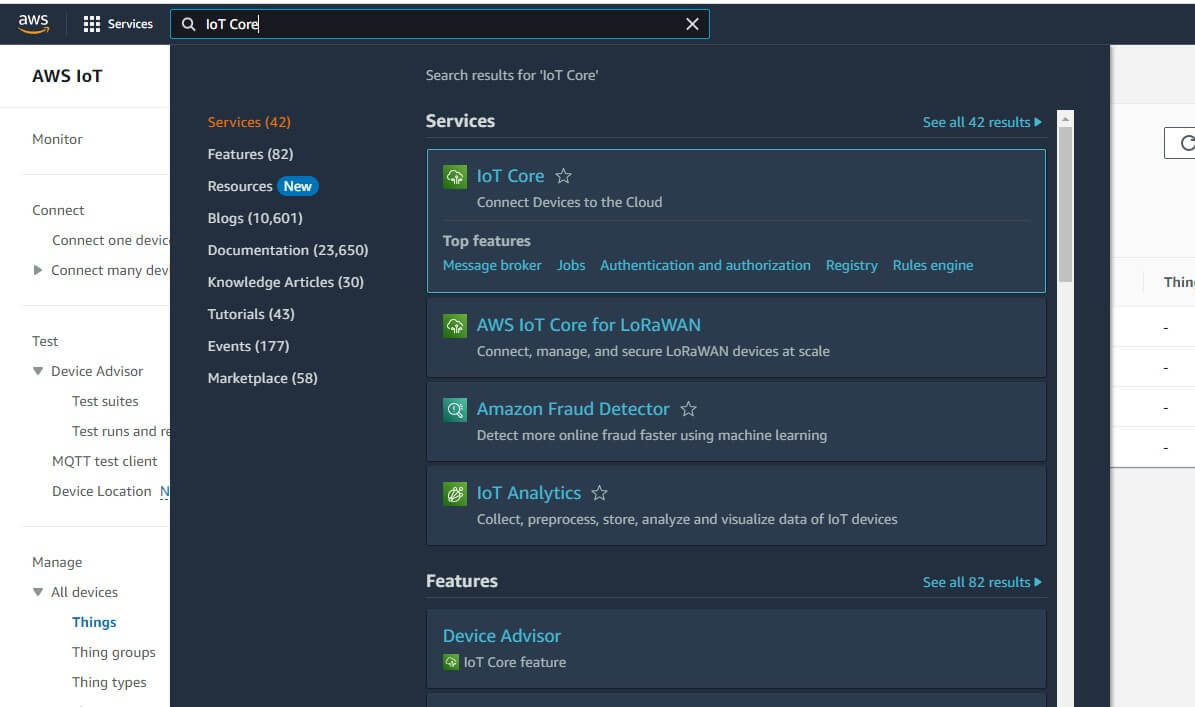
3. Create new things
1) Enter IoT Core, find Manage group, click All devices-Things, then click Create things.
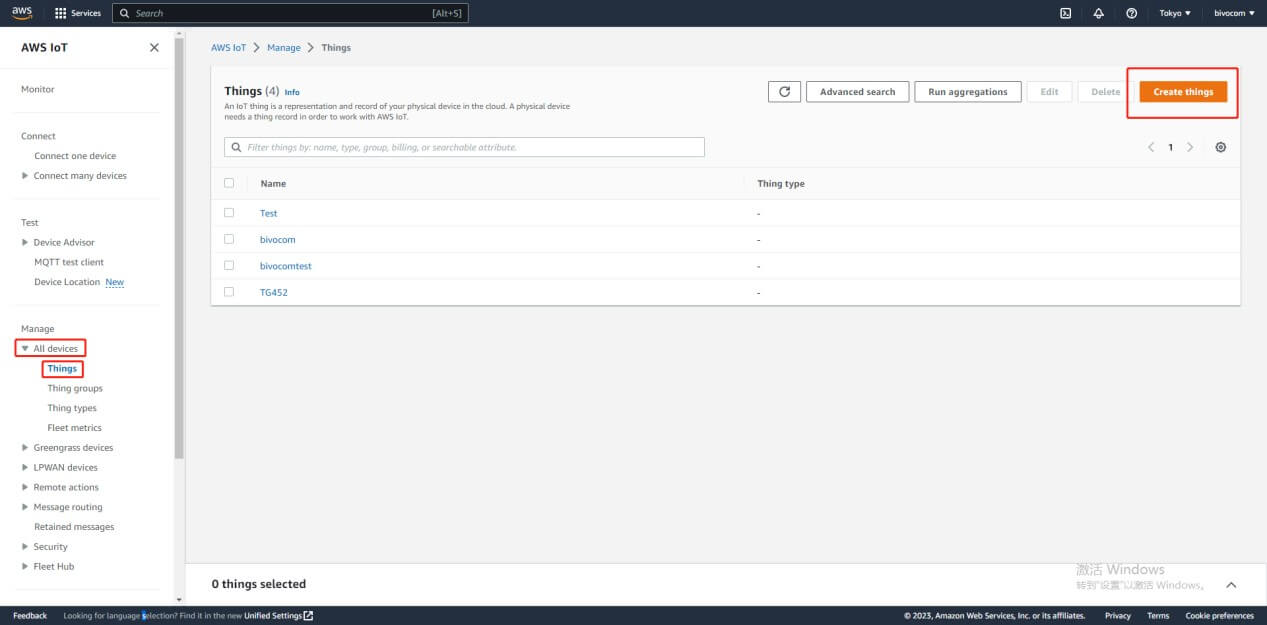
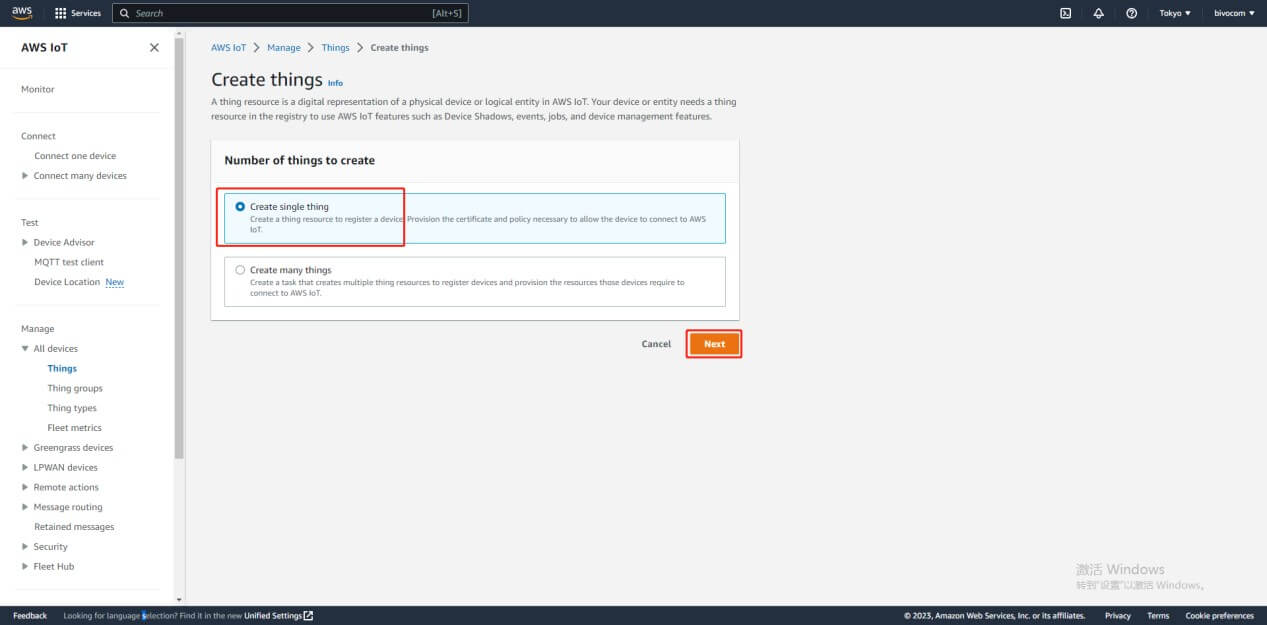
2) Create single thing then click next.
3) Enter a name of the things, then click next.
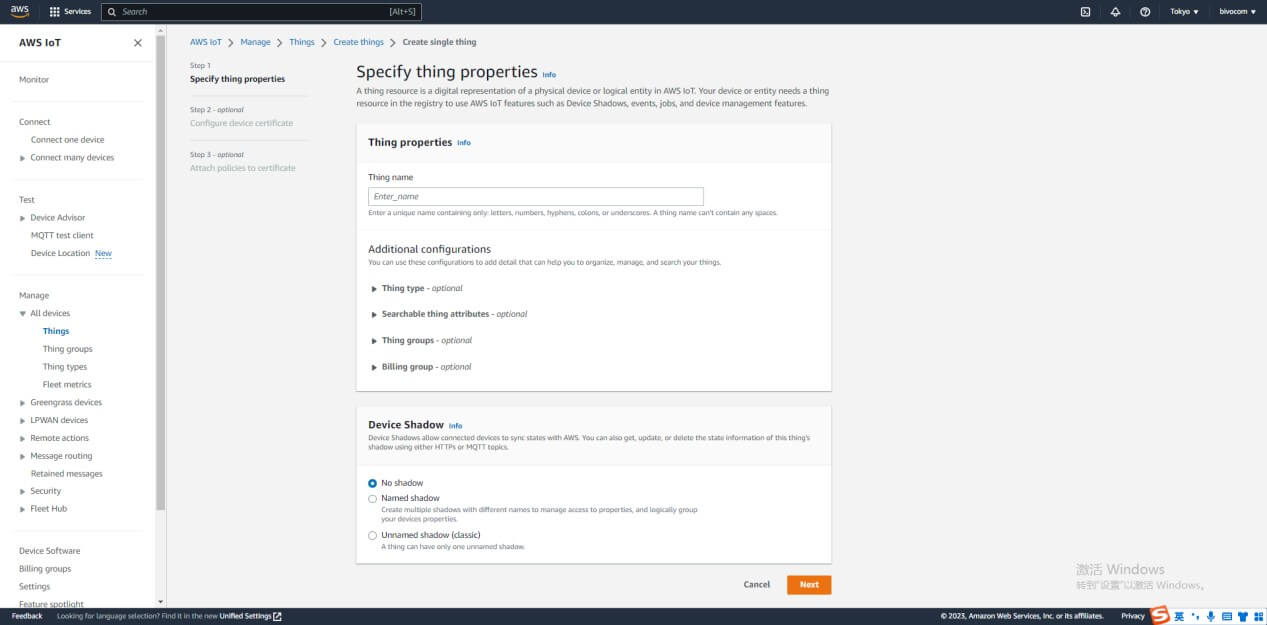
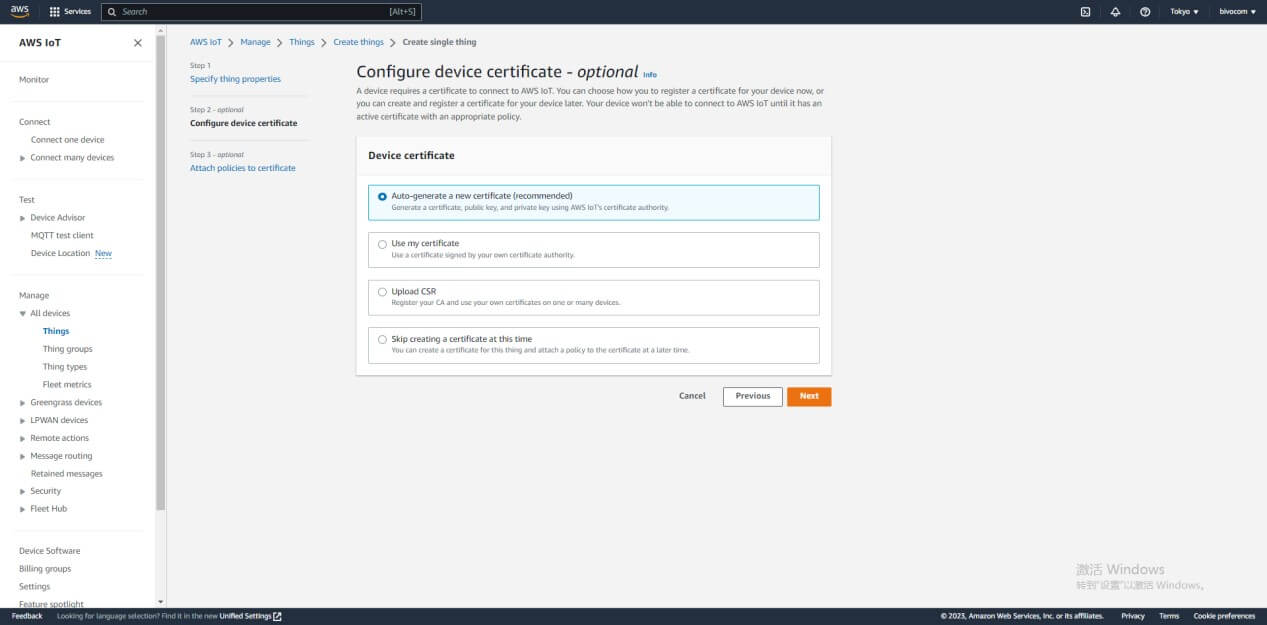
4) Configure device certificate, chose Auto-generate a new certificate, then click next.
*Option setting: Create policy
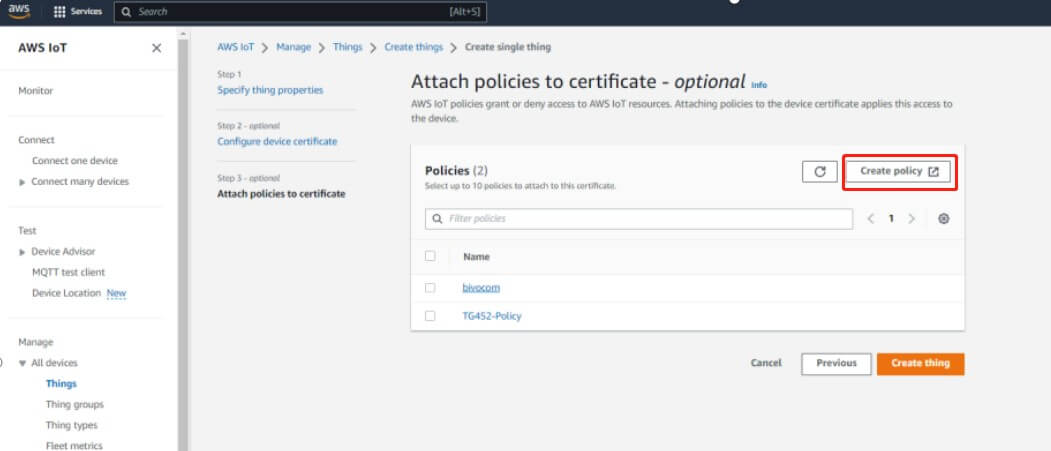
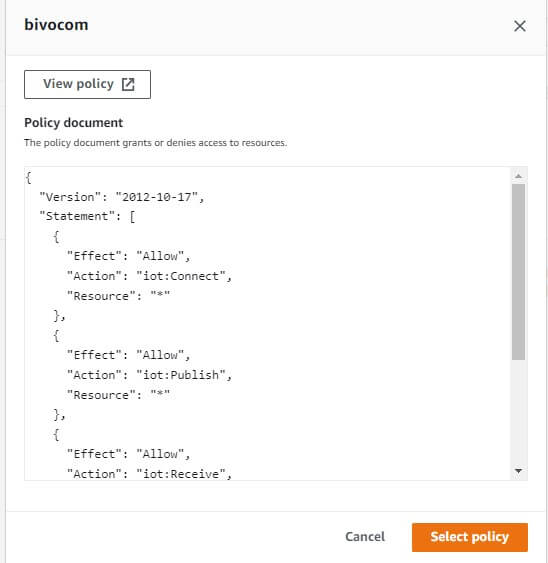
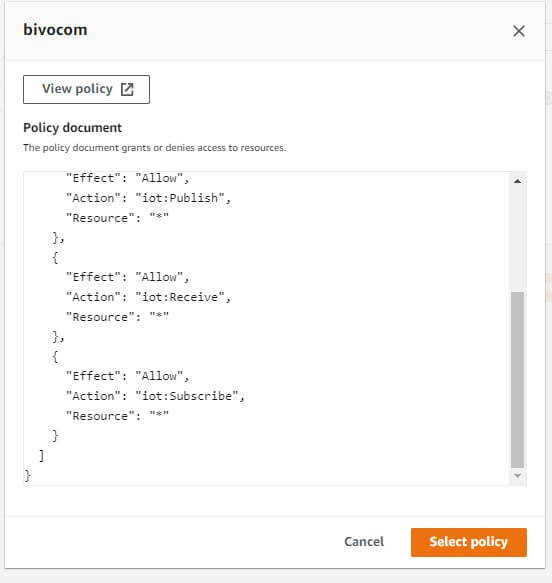
5) If you already have a policy include iot:Connect, iot:Publish, iot:Receive and iot:Subscribe, please ignore this setting. Click Create policy then enter a new name.
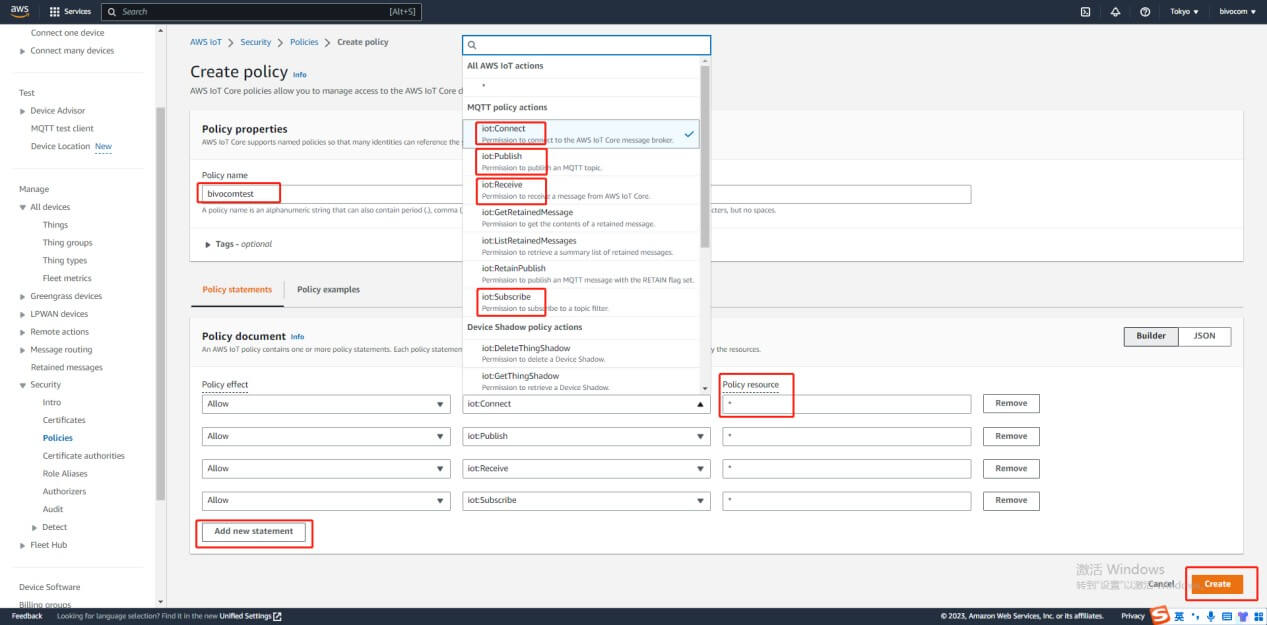
6) Click add new statement to add policy effect, we need 4 MQTT policy actions, include iot:Connect, iot:Publish, iot:Receive and iot:Subscribe, fill * at the policy resource. After settings done, click create button.
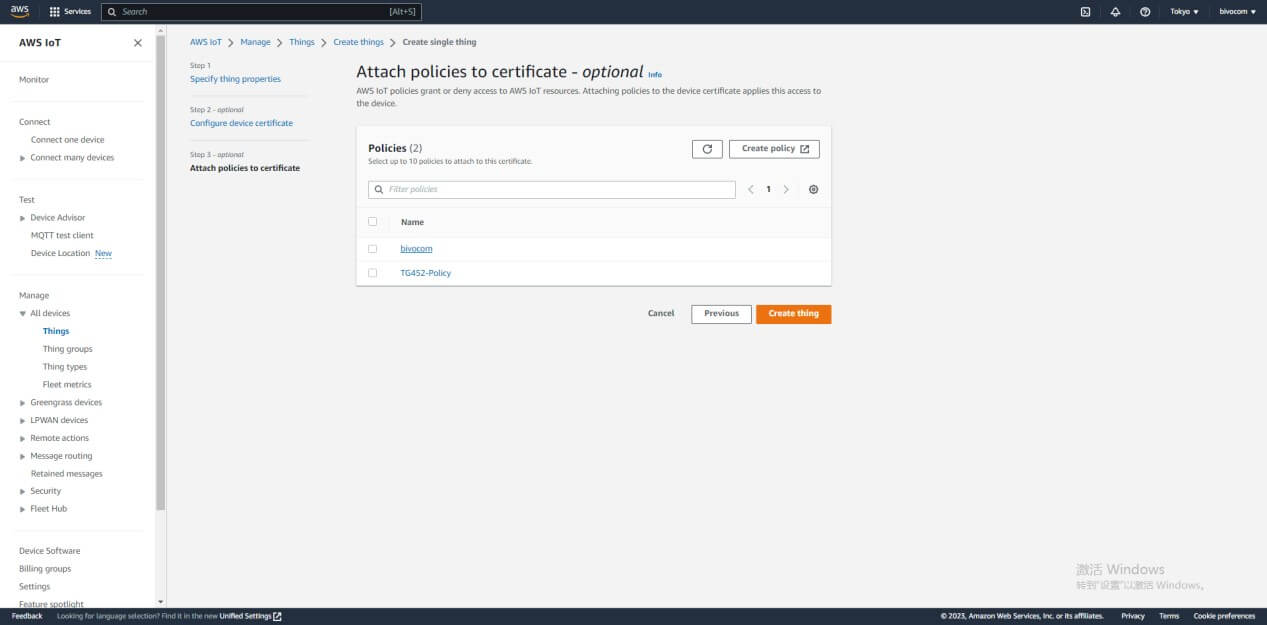
7) Chose the policy which has the 4 MQTT policy actions we need, then click create thing.
8) After you successfully create a new thing, it will jump to this page to download certificates and keys. Download all of the certificates and keys.
*Notice: this is the only time you can download the certificates and keys.
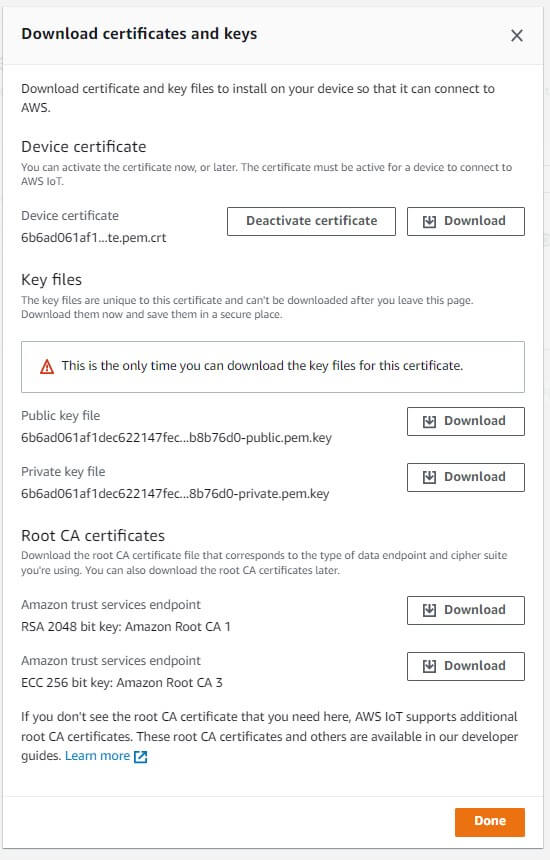
You will save 5 certificate files and you can rename them. In this case, we will use their files to do authentication.

Here are the files after rename:

4. Python script
1) In this case, we test TR321 with 32M Flash and Python environment built-in to connect AWS IoT Core, we will use AWS IoT SDK for Python. Here are the link of github and AWS:
https://github.com/aws/aws-iot-device-sdk-python-v2
https://aws.amazon.com/premiumsupport/knowledge-center/iot-core-publish-mqtt-messages-python/
2) Install the AWS IoT Device SDK for Python (the previous SDK version) by running the following command:
pip install AWSIoTPythonSDK
3) In the AWS IoT Core console, in the left navigation pane, choose Settings.
4) On the Settings page, under Custom endpoint, copy the Endpoint. This AWS IoT Core custom endpoint URL is personal to your AWS account and Region.
5) Create a Python program file
6) Save one of the following Python code examples as a Python program file named publish.py.
7) If you installed the AWS IoT SDK for Python v2 earlier, then use the following example code:
Important: Replace customEndpointUrl with your AWS IoT Core custom endpoint URL. Replace certificates with the name of your certificates sub-directory. Replace a1b23cd45e-certificate.pem.crt with the name of your client .crt. Replace a1b23cd45e-private.pem.key with the name of your private key.
# Copyright Amazon.com, Inc. or its affiliates. All Rights Reserved.
# SPDX-License-Identifier: MIT-0
from awscrt import io, mqtt, auth, http
from awsiot import mqtt_connection_builder
import time as t
import json
# Define ENDPOINT, CLIENT_ID, PATH_TO_CERTIFICATE, PATH_TO_PRIVATE_KEY, PATH_TO_AMAZON_ROOT_CA_1, MESSAGE, TOPIC, and RANGE
ENDPOINT = “customEndpointUrl”
CLIENT_ID = “testDevice”
PATH_TO_CERTIFICATE = “certificates/a1b23cd45e-certificate.pem.crt”
PATH_TO_PRIVATE_KEY = “certificates/a1b23cd45e-private.pem.key”
PATH_TO_AMAZON_ROOT_CA_1 = “certificates/root.pem”
MESSAGE = “Hello World”
TOPIC = “test/testing”
RANGE = 20
# Spin up resources
event_loop_group = io.EventLoopGroup(1)
host_resolver = io.DefaultHostResolver(event_loop_group)
client_bootstrap = io.ClientBootstrap(event_loop_group, host_resolver)
mqtt_connection = mqtt_connection_builder.mtls_from_path(
endpoint=ENDPOINT,
cert_filepath=PATH_TO_CERTIFICATE,
pri_key_filepath=PATH_TO_PRIVATE_KEY,
client_bootstrap=client_bootstrap,
ca_filepath=PATH_TO_AMAZON_ROOT_CA_1,
client_id=CLIENT_ID,
clean_session=False,
keep_alive_secs=6
)
print(“Connecting to {} with client ID ‘{}’…”.format(
ENDPOINT, CLIENT_ID))
# Make the connect() call
connect_future = mqtt_connection.connect()
# Future.result() waits until a result is available
connect_future.result()
print(“Connected!”)
# Publish message to server desired number of times.
print(‘Begin Publish’)
for i in range (RANGE):
data = “{} [{}]”.format(MESSAGE, i+1)
message = {“message” : data}
mqtt_connection.publish(topic=TOPIC, payload=json.dumps(message), qos=mqtt.QoS.AT_LEAST_ONCE)
print(“Published: ‘” + json.dumps(message) + “‘ to the topic: ” + “‘test/testing'”)
t.sleep(0.1)
print(‘Publish End’)
disconnect_future = mqtt_connection.disconnect()
disconnect_future.result()
8) If you installed the AWS IoT Device SDK for Python (the previous SDK version), then use the following example code:
Important: Replace customEndpointUrl with your AWS IoT Core custom endpoint URL. Replace certificates with the name of your certificates sub-directory. Replace a1b23cd45e-certificate.pem.crt with the name of your client .crt. Replace a1b23cd45e-private.pem.key with the name of your private key.
# Copyright Amazon.com, Inc. or its affiliates. All Rights Reserved.
# SPDX-License-Identifier: MIT-0
import time as t
import json
import AWSIoTPythonSDK.MQTTLib as AWSIoTPyMQTT
# Define ENDPOINT, CLIENT_ID, PATH_TO_CERTIFICATE, PATH_TO_PRIVATE_KEY, PATH_TO_AMAZON_ROOT_CA_1, MESSAGE, TOPIC, and RANGE
ENDPOINT = “customEndpointUrl”
CLIENT_ID = “testDevice”
PATH_TO_CERTIFICATE = “certificates/a1b23cd45e-certificate.pem.crt”
PATH_TO_PRIVATE_KEY = “certificates/a1b23cd45e-private.pem.key”
PATH_TO_AMAZON_ROOT_CA_1 = “certificates/root.pem”
MESSAGE = “Hello World”
TOPIC = “test/testing”
RANGE = 20
myAWSIoTMQTTClient = AWSIoTPyMQTT.AWSIoTMQTTClient(CLIENT_ID)
myAWSIoTMQTTClient.configureEndpoint(ENDPOINT, 8883)
myAWSIoTMQTTClient.configureCredentials(PATH_TO_AMAZON_ROOT_CA_1, PATH_TO_PRIVATE_KEY, PATH_TO_CERTIFICATE)
myAWSIoTMQTTClient.connect()
print(‘Begin Publish’)
for i in range (RANGE):
data = “{} [{}]”.format(MESSAGE, i+1)
message = {“message” : data}
myAWSIoTMQTTClient.publish(TOPIC, json.dumps(message), 1)
print(“Published: ‘” + json.dumps(message) + “‘ to the topic: ” + “‘test/testing'”)
t.sleep(0.1)
print(‘Publish End’)
myAWSIoTMQTTClient.disconnect()
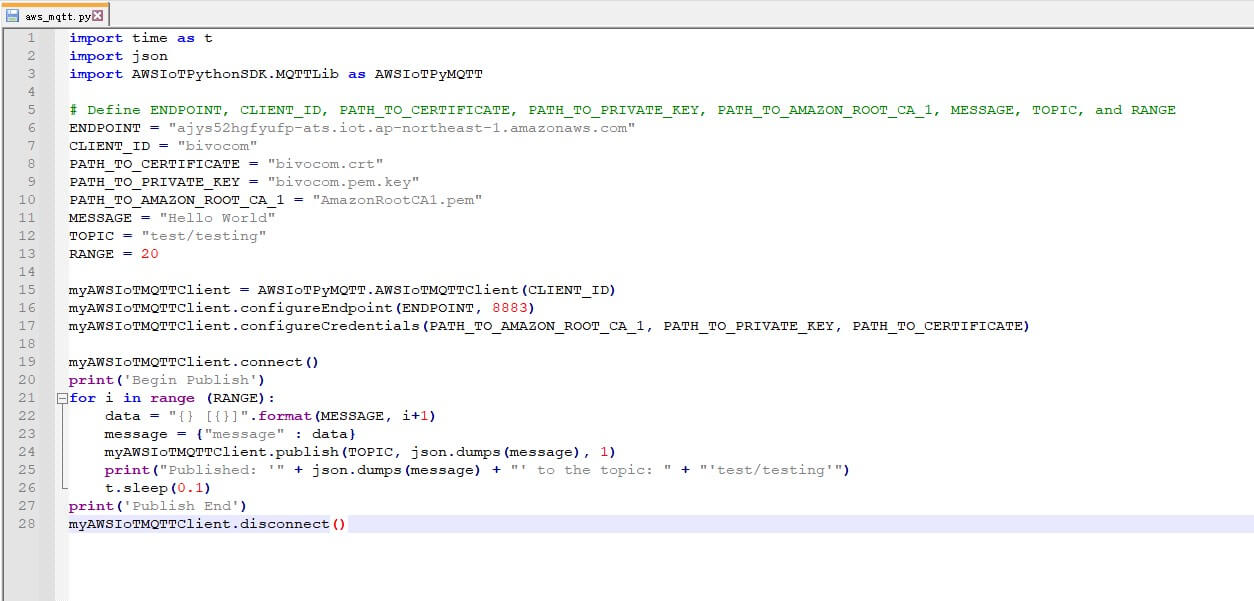
9) Here are the codes after replace certificate files name:
5. Test the setup
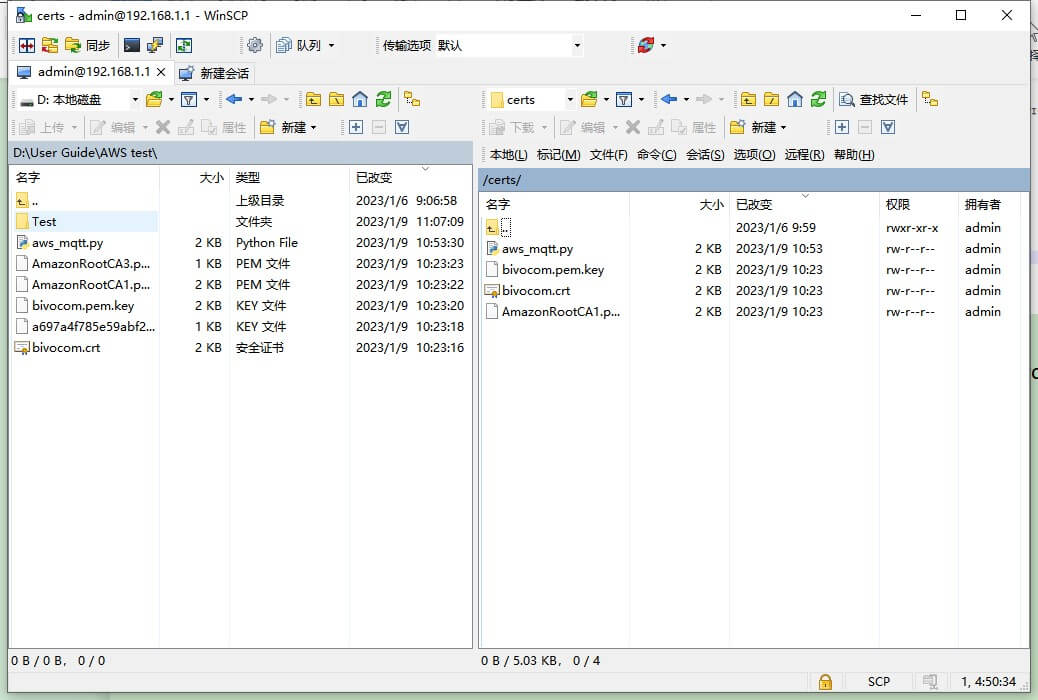
1) Use WinSCP or the other tools to upload the certificates, keys and python code to the router. In this case, we use WinSCP to do it.
2) pip install AWSIoTPythonSDK at TR321.

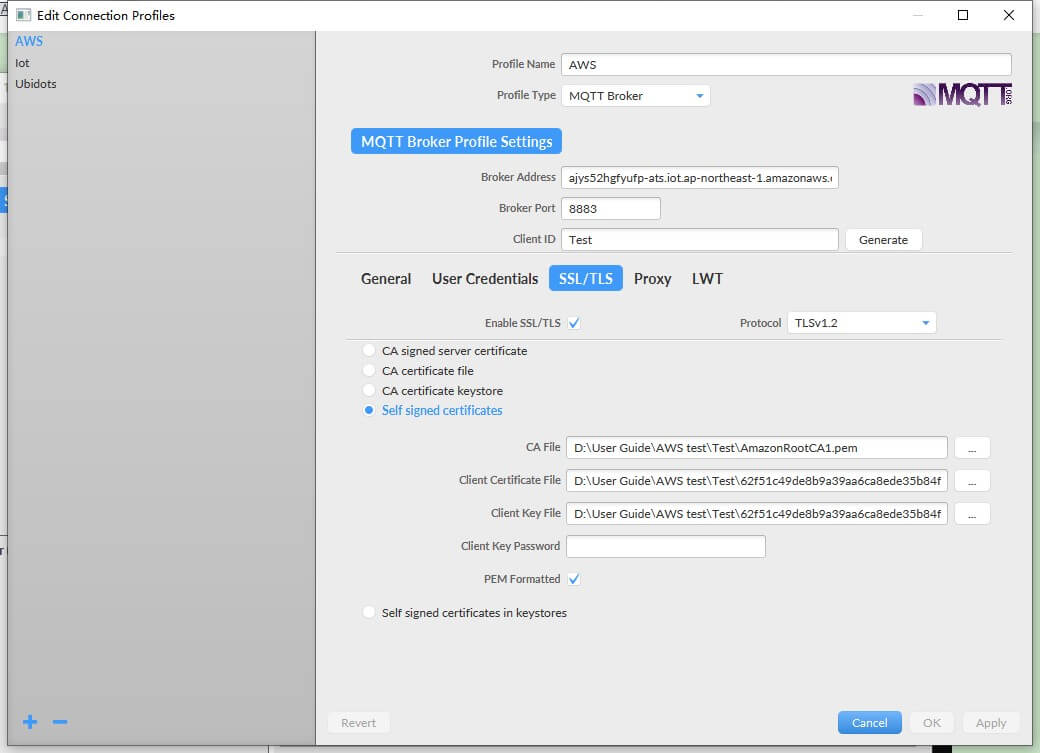
3) In order to receive topic message, we can create another AWS thing at AWS IoT Core console, we can use the same policy with the first thing. Then use MQTT FX to connect AWS with the new certificates and keys.
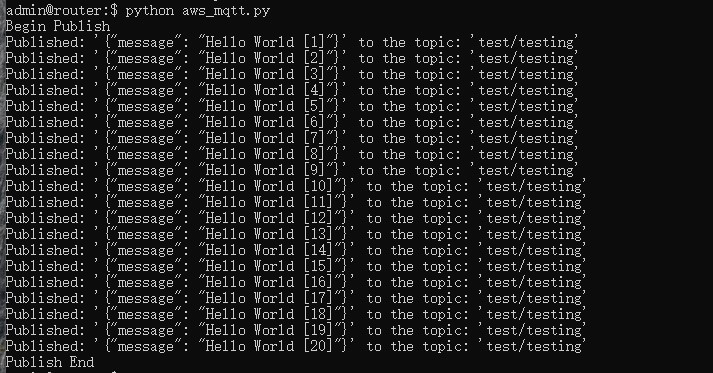
4) Run aws.py
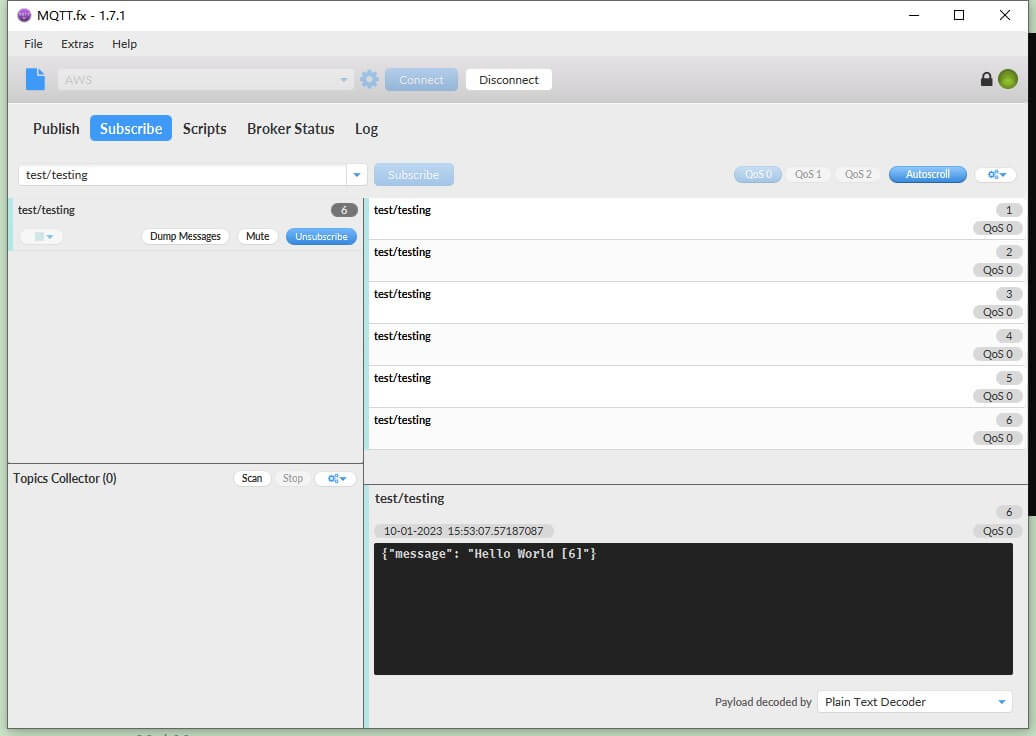
5) We can see message “Hello World” with subscribe the test/testing topic.

1 Comment