2 Ways of Building Your Own Application on IoT Routers and Gateways

This article shows you 2 ways of building your own application on Bivocom IoT routers and gateways under OpenWRT based Linux OS.


2 Types of Development Environments

  1. Bivocom provides toolchain (MOQ required), and developers can compile their own application code and install the application on LINUX OS
  2. Bivocom provides a hardware with pure OpenWRT environment (22.03.0) which developers can build their own images


Pleases note that above environments require the developers have deeper knowledge of programming(C/C++, Python, etc.), as Bivocom team only provides basic support on standard product, and may require MOQ and R&D cost if customers want Bivocom team to customize the firmware for them.


Bivocom TG463 Gateways Secondary Development Compiler Instruction


Bivocom TG serial gateways provide powerful hardware computing capability, while TR serial routers with basic hardware computing capability. They all supports secondary development by users using Bivocom owns compiler to create your specific programs and running on TG or TR devices to match your application.

This instruction indicate how to use Bivocom compiler to create your own programs.

Minimum Operating Environment

  • Hardware: 64 bit CPU, 2G RAM, 10G Storage.
  • OS: Redhat/Ubuntu/Centos/Suse 64 bit.


Programming language Requirements

  • Developer shall have knowledge of socket, Linux device file
  • Secondary development only supports C/C++ programming


About TG463

CPU:            MIPS, dual core, 800MHZ, 32K Icache, 32K Dcache

RAM:            256MB

Flash:       32MB

Ethernet ports:    5X10/100/1000M

Serial ports:  1xRS232, 1xRS485

DI/DO:        2xDI, 2xRelay

ADC:          3(4-20mA, or 0-5V)


Software Interface Description

  1. Serial Port Device File
    1. RS232: /dev/ttyS0
    2. RS485:/dev/ttyS1


  1. Read ADC

int read_adc_raw(int adc_num)

Parameters description:

adc_num: 1, 2, used to indicate which ADC to read

Return: 0~4096

If return is X, please use formula Y =(X/4096)*6.72, to convert it to real voltage value.


  1. Configure GPIO input and output

int gpio_set_dir(unsigned int gpio_num, unsigned int dir)

Parameters description:

gpio_num: input GPIO_DI1, GPIO_DI2 or GPIO_RELAY1, GPIO_RELAY2, to indicate which channel of GPIO to operate

dir:   input DIR_IN, DIR_OUT, to configure the digital input or digital output(relay)

Return:

1: success

0: fail


  1. To get GPIO data

int gpio_get_val(unsigned int gpio_num, unsigned int *val)

gpio_num:  input GPIO_DI1, GPIO_DI2 or GPIO_RELAY1, GPIO_RELAY2, to indicate the value of GPIO

val: value of gpio, return 0,1

Return:

1: success

0: fail


  1. Configure GPIO value

int gpio_set_val(unsigned int gpio_num, unsigned int val)

Parameters description:

gpio_num: input GPIO_DI1, GPIO_DI2 or GPIO_RELAY1, GPIO_RELAY2, to indicate which channel of GPIO to operate

val:   0 or 1 only.

Return:

1: success

0: fail


Operation Steps

If you have got the toolchain of TG463 from Bivocom team, you can follow below steps.

  1. Copy the complier file “toolchain.tgz” into your directory of Linux system, here take “/opt” as example.

After that, Unzip the toolchain:

tar xzvf TG463_toolchain.tgz –C /opt/


  1. Configure cross-complied environment:

export PATH=$PATH:”/opt/staging_dir/toolchain-mipsel_24kc_gcc-7.3.0_musl/bin/”

Input commands:

mipsel-openwrt-linux-gcc

If about commands running, it means the cross-complied environment has been established.

Example:

Below is an example of how to use Bivocom TG463 to read ADC1(voltage value), DI1, control relay on/off, codes as below.


#include <stdio.h>

#include <string.h>

#include <gpio.h>   /* have to include , GPIO_DIx, GPIO_RELAYx defined in this head file */


int main(void)

{

int ret;

int raw_adc;

float voltage;

unsigned int val;


printf(“start to test \n”);


raw_adc = read_adc_raw(1);  /* read ADC channel 1 */

printf(“raw adc 1 value is %d\n”, raw_adc);

voltage = (float)raw_adc / 4096;

voltage *= 6.72;

printf(“adc1 voltage is %.3f\n”, voltage);


ret = gpio_set_dir(GPIO_DI1, DIR_IN);  /* set DI1 to input */

if (ret == 1) {

ret = gpio_get_val(GPIO_DI1, &val);

printf(“GPIO_DI1 value is %d\n”, val);

} else {

printf(“Fails to set di dir %d\n”, GPIO_DI1);

}


ret = gpio_set_dir(GPIO_RELAY1, DIR_OUT);  /* set RELAY1 to output */

if (ret == 1) {

val = 1;

ret = gpio_set_val(GPIO_RELAY1, val);

} else {

printf(“Fails to set relay dir %d\n”, GPIO_RELAY1);

}


return 0;

}


Makefile’s content as below:

LIB_DIR=/opt/staging_dir/target-mipsel_24kc_musl /usr/lib/

INCLUDE_DIR=/opt/staging_dir/target-mipsel_24kc_musl/usr/include

CC= mipsel-openwrt-linux-gcc


CFLAGS=-I $(INCLUDE_DIR)

LDFLAGS=-L $(LIB_DIR)


all: test


%.o:%.c

$(CC) $(CFLAGS) -c -o $@ $^


test: test.o

$(CC) $(LDFLAGS) -o $@ $^ -lgpio


Bivocom will provide the code of this application, and you can edit the codes of above example.

If above cross-complied environment has been set up, then you can ‘make’, and generate the executable program of ‘test’, as below

2 Ways of Building Your Own Application on IoT Routers and Gateways This article shows you 2 ways of building your own applications on Bivocom IoT routers and gateways under OpenWRT based Linux OS. 2 Types of Development Environments 1. Bivocom provides toolchain (MOQ required), and developers can compile their own application code and install the application on LINUX OS 2. Bivocom provides a hardware with pure OpenWRT environment (22.03.0) which developers can build their own images Pleases note that above environments require the developers have deeper knowledge of programming(C/C++, Python, etc.), as Bivocom team only provides basic support on standard product, and may require MOQ and R&D cost if customers want Bivocom team to customize the firmware for them. Bivocom TG463 Gateways Secondary Development Compiler Instruction Bivocom TG serial gateways provide powerful hardware computing capability, while TR serial routers with basic hardware computing capability. They all supports secondary development by users using Bivocom owns compiler to create your specific programs and running on TG or TR devices to match your application. This instruction indicate how to use Bivocom compiler to create your own programs. Minimum Operating Environment  Hardware: 64 bit CPU, 2G RAM, 10G Storage.  OS: Redhat/Ubuntu/Centos/Suse 64 bit. Programming language Requirements  Developer shall have knowledge of socket, Linux device file  Secondary development only supports C/C++ programming About TG463 CPU: MIPS, dual core, 800MHZ, 32K Icache, 32K Dcache RAM: 256MB Flash: 32MB Ethernet ports: 5X10/100/1000M Serial ports: 1xRS232, 1xRS485 DI/DO: 2xDI, 2xRelay ADC: 3(4-20mA, or 0-5V) Software Interface Description 1. Serial Port Device File a) RS23: /dev/ttyS0 b) RS485:/dev/ttyS1 2. Read ADC int read_adc_raw(int adc_num) Parameters description: adc_num: 1, 2, used to indicate which ADC to read Return: 0~4096 If return is X, please use formula Y =(X/4096)*6.72, to convert it to real voltage value. 3. Configure GPIO input and output int gpio_set_dir(unsigned int gpio_num, unsigned int dir) Parameters description: gpio_num: input GPIO_DI1, GPIO_DI2 or GPIO_RELAY1, GPIO_RELAY2, to indicate which channel of GPIO to operate dir: input DIR_IN, DIR_OUT, to configure the digital input or digital output(relay) Return: 1: success 0: fail 4. To get GPIO data int gpio_get_val(unsigned int gpio_num, unsigned int *val) gpio_num: input GPIO_DI1, GPIO_DI2 or GPIO_RELAY1, GPIO_RELAY2, to indicate the value of GPIO val: value of gpio, return 0,1 Return: 1: success 0: fail 5. Configure GPIO value int gpio_set_val(unsigned int gpio_num, unsigned int val) Parameters description: gpio_num: input GPIO_DI1, GPIO_DI2 or GPIO_RELAY1, GPIO_RELAY2, to indicate which channel of GPIO to operate val: 0 or 1 only. Return: 1: success 0: fail Operation Steps If you have got the toolchain of TG463 from Bivocom team, you can follow below steps. 1. Copy the complier file “toolchain.tgz” into your directory of Linux system, here take “/opt” as example. After that, Unzip the toolchain: tar xzvf TG463_toolchain.tgz –C /opt/ 2. Configure cross-complied environment: export PATH=$PATH:"/opt/staging_dir/toolchain-mipsel_24kc_gcc-7.3.0_musl/bin/" Input commands: mipsel-openwrt-linux-gcc If about commands running, it means the cross-complied environment has been established. Example: Below is an example of how to use Bivocom TG463 to read ADC1(voltage value), DI1, control relay on/off, codes as below. #include #include #include /* have to include , GPIO_DIx, GPIO_RELAYx defined in this head file */ int main(void) { int ret; int raw_adc; float voltage; unsigned int val; printf("start to test \n"); raw_adc = read_adc_raw(1); /* read ADC channel 1 */ printf("raw adc 1 value is %d\n", raw_adc); voltage = (float)raw_adc / 4096; voltage *= 6.72; printf("adc1 voltage is %.3f\n", voltage); ret = gpio_set_dir(GPIO_DI1, DIR_IN); /* set DI1 to input */ if (ret == 1) { ret = gpio_get_val(GPIO_DI1, &val); printf("GPIO_DI1 value is %d\n", val); } else { printf("Fails to set di dir %d\n", GPIO_DI1); } ret = gpio_set_dir(GPIO_RELAY1, DIR_OUT); /* set RELAY1 to output */ if (ret == 1) { val = 1; ret = gpio_set_val(GPIO_RELAY1, val); } else { printf("Fails to set relay dir %d\n", GPIO_RELAY1); } return 0; } Makefile’s content as below: LIB_DIR=/opt/staging_dir/target-mipsel_24kc_musl /usr/lib/ INCLUDE_DIR=/opt/staging_dir/target-mipsel_24kc_musl/usr/include CC= mipsel-openwrt-linux-gcc CFLAGS=-I $(INCLUDE_DIR) LDFLAGS=-L $(LIB_DIR) all: test %.o:%.c $(CC) $(CFLAGS) -c -o $@ $^ test: test.o $(CC) $(LDFLAGS) -o $@ $^ -lgpio Bivocom will provide the code of this application, and you can edit the codes of above example. If above cross-complied environment has been set up, then you can ‘make’, and generate the executable program of ‘test’, as below The compiled executable file ‘test’ can now TFTP to the TG463, for example, your computer's IP address is 192.168.1.10; (Note: The router is connected to the computer through the network cable and connected to any LAN port) a. Run the tftPD32 program on your computer and change the current directory to the one where the ‘test’ file resides b. telnet 192.168.1.1 to TG463,default account and password: admin c. Run command: tftp –r test –g 192.168.1.10 // to download the ‘test’ to TG463 d. chmod a+x test // Modify the program to run e: ./test //run application If the program debugging is OK, you can put the program in the /usr/bin/directory f. To configure this program to run on startup, simply add it to /etc/rc.local as shown in the following image: ‘&’ is required Attachments  Bivocom TG463 Compiler “TG463_toolchain.tgz”. How to Set Up IoT Gateway Under Latest OpenWrt 22.03.0?

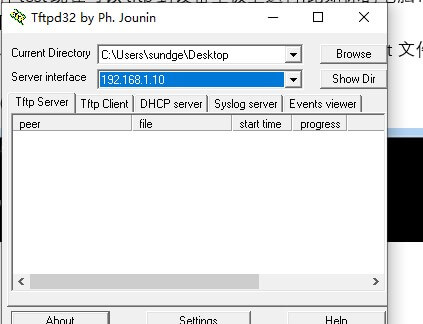
The compiled executable file ‘test’ can now TFTP to the TG463, for example, your computer’s IP address is 192.168.1.10; (Note: The router is connected to the computer through the network cable and connected to any LAN port)

1) Run the tftPD32 program on your computer and change the current directory to the one where the ‘test’ file resides
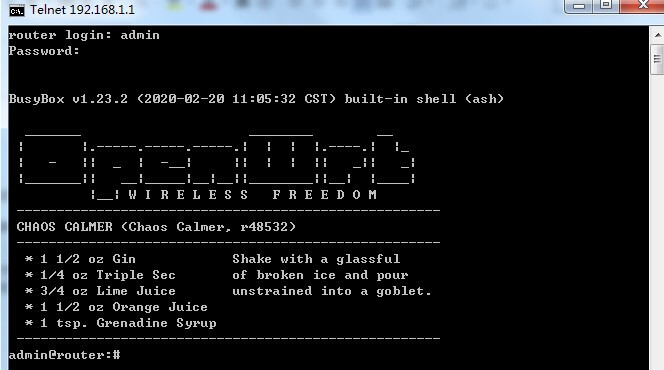
2) Telnet 192.168.1.1 to TG463,default account and password: admin

Bivcom cross-compiled environment 2

3) Run command: tftp –r test –g 192.168.1.10 // to download the ‘test’ to TG463

4 Bivcom cross-compiled environment 1

4) chmod a+x test // Modify the program to run

5 Bivcom cross-compiled environment 1

e: ./test         //run application

If the program debugging is OK, you can put the program in the /usr/bin/directory


5) To configure this program to run on startup, simply add it to /etc/rc.local as shown in the following image:

‘&’ is required


Attachments

  • Bivocom TG463 Compiler “TG463_toolchain.tgz”.

Only available for customers who have cooperated with Bivocom and have projects working on(MOQ required)


How to Set Up IoT Gateway Under Latest OpenWrt 22.03.0?

Please go to below link:

https://www.bivocom.com/blog/how-to-set-up-iot-gateway-under-latest-openwrt-22-03-0


Banner image source: https://www.pexels.com/zh-cn/photo/943096/

 

Print Email

Comment

Be the first one who leave the comment.

Leave a Reply

We use cookies to deliver you the best experience. By browsing our website you agree to our use of cookies.